Welcome back to the Ishimura
Dead Space review: What we think
Dead Space remake: Everything that’s new
Dead Space weapon locations: Get the guns
Dead Space Crew Rigs: Master Override clearance
Dead Space Security Clearance: Opens doors and chests
Dead Space Marker Fragments are a new collectible that only appears during new game plus. These mini-markers are key to unlocking the secret Dead Space ending that the remake added to the game. There are 12 of these fragments scattered throughout the Ishimura, and since the game has twelve chapters, it mostly ties in to one per chapter, except for chapter nine that is.
In this Marker Fragment location guide, I’ll walk you through where to find the fragments in each chapter, including the best order to get them, and how to activate the secret ending. Make sure you complete the game first and move onto new game plus before you start searching, since they straight up won’t appear if you’re on your first playthrough. Either way, here’s each Dead Space Marker Fragment location and the order you should grab them.
Marker Fragment one: Tram Control
The first Marker Fragment is available in chapter one on the Tram Control deck, and is directly in your path. When you enter the office to recover the data board for the tram, look at the bookcase to your right to see a Marker Fragment on the shelf. You can shoot the books next to it to access it, or use stasis to pull it towards you and grab it.
Marker Fragment two: Medical
Image 1 of 2
The second Marker Fragment is hidden in the Research Wing of the Medical Deck. When you head there during chapter two to grab the Shock Pad, go down the lift, and head into Terence Kyne’s office. Use kinesis to slide his bookcase to the side, revealing a secret room with the Marker Fragment resting on an altar.
Marker Fragment three: Engineering
Image 1 of 2
The third Marker Fragment is concealed in the Engine Room on the Engineering Deck. You’ll find yourself there during chapter three to restart the engines. Before you do, head straight on and turn left into the gap between the crates near the pipe. The Marker Fragment is hidden in the dark area to the right of the bench with the robot arms.
Marker Fragment four: Admin Systems
Image 1 of 2
The fourth Marker Fragment is located in Admin Systems on the Bridge Deck. During chapter four you’ll have to head here to divert power to the ADS Cannons via the elevator in the Bridge Atrium. As you head down the corridor, look for the Break Room on the right side, and go into it to find the Marker Fragment on the floor by the screen showing the big marker.
Marker Fragment five: Medical
The fifth Marker Fragment is located on the Medical Deck, but is only accessible once you’ve started chapter five, unlike the second fragment. After the Hunter is released, you’ll have to head to Dr. Mercer’s office to override the lockdown. You can find the Marker Fragment here on the table below the opened-up Necromorph Infector specimen.
Marker Fragment six: Medical
Image 1 of 2
The sixth Marker Fragment is in Cryogenics on the Medical Deck. When you go here during chapter five to fight and freeze the Necromorph Hunter, you can find the fragment on top of the big Cryo chamber in the centre of the room. Run around to far side from where you come in, then turn around and look up to see it. Then all you’ve got to do is grab it with kinesis.
Marker Fragment seven: Hydroponics
Image 1 of 2
The seventh Marker Fragment is located in the East Grow Chamber of the Hydroponics Deck. You’ll have to come here in chapter six to inject some Wheezers. The Marker Fragment is located in the upper corner to your right as you come in, but I was only able to access it by turning off the gravity with the Circuit Breaker on the ground level. You have to do this to get to one of the Wheezers anyway. Once turned off, float up to the right-hand corner and grab the Marker Fragment.
To get to the East Grow Chamber, head through the door to West Tower from the Hydroponics hub and then into the West Grow Chamber. Go up the elevator to floor two, into Hydroponic’s Control, and then straight on through the door ahead.
Marker Fragment eight: Mining
Image 1 of 2
The eighth Marker Fragment is located on the Processing level of the Mining Deck. This is the only one that requires Security Clearance to grab. After you’ve collected Dallas’s Rig in chapter seven and gotten Security Clearance level three, head back through the big processing chamber and out the opposite side. You’ll see a Security Clearance level three door to Mineral Samples near a shop. Unlock this and head inside to find the Marker Fragment.
Marker Fragment nine: Comms Array
Image 1 of 2
The ninth Marker Fragment is located in the Comms Array on the Bridge Deck. During chapter eight you’ll head here to fix it. When you go inside the zero-G array itself, float on over to the big Necromorph growth to the left of the communication control sign. You’ll find the Marker Fragment floating inside of it.
Marker Fragment ten: Crew Deck
Image 1 of 2
The tenth Marker Fragment is located in the Deluxe Quarters on the Crew Deck. During chapter ten you’ll destroy some growths that unlock access to the elevator in the room with the marker. Head up this and into level B. Once you install the power, use the Circuit Breaker to open the doors, and go back towards the common room with the B symbols around the outside. The two far doors will now be open. Go into either and look to the left side of the room to find the Marker Fragment on a desk.
Marker Fragment eleven: Crew Deck
The eleventh Marker Fragment is located in the room where you meet Terence Kyne on the Crew Deck. During chapter ten at the end of the Crew Deck section, Terence will give you access to the Inquiry Desks room with the final Necromorph growth. As you head inside, look straight ahead and you’ll see a wine bottle on a desk which is partially blocking the Marker Fragment from view.
Marker Fragment twelve: Cargo
The twelfth Marker Fragment is in the Cargo Bay on the Cargo Deck. This area unlocks in chapter eleven when you have to move the Marker. Once you head down the lift into the bay itself, turn left and follow the walkway around until you reach the far corner. You’ll find the Marker Fragment on some shelves there.
How to activate the secret ending
Image 1 of 2
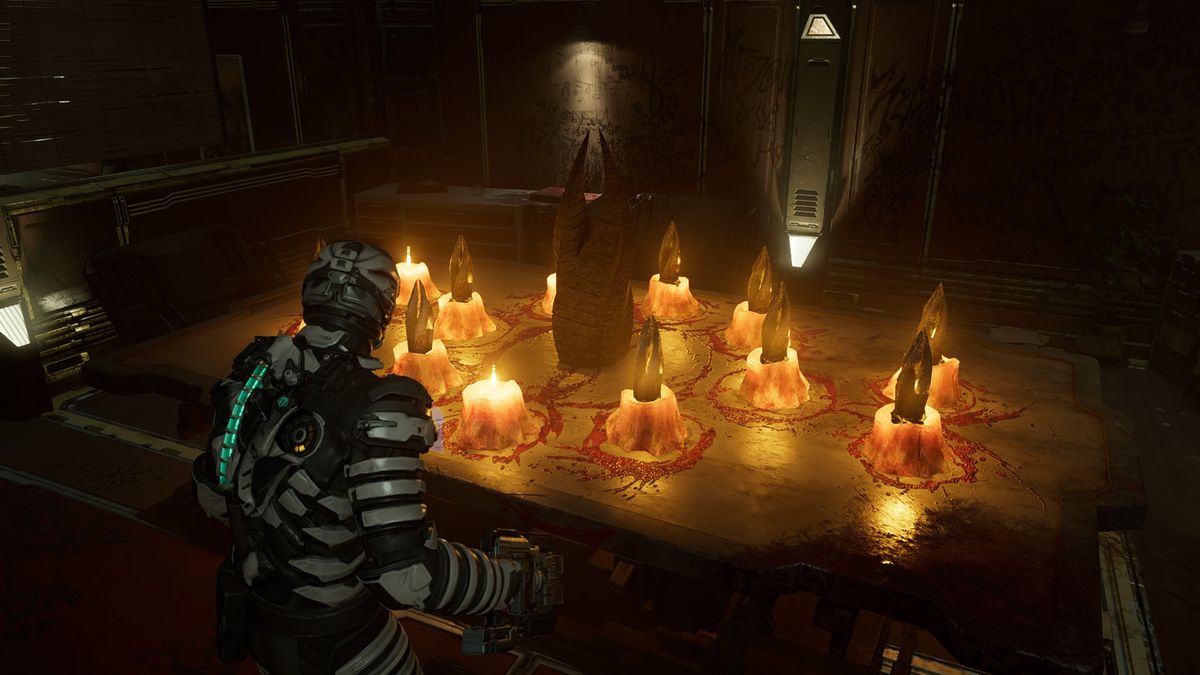
After you’ve collected all twelve Marker Fragments, you need to head to Captain Mathius’ room in the Executive Quarters on the Crew Deck. Here, you’ll find a marker sculpture on a table with twelve slots around it. Place the markers in these to activate the secret ending when you complete chapter 11 and 12 as normal.
You can get to the Executive Quarters by heading to the central room where the Marker and the Hunter were in chapter ten, up the elevator, and then by following the walkway around past the save point to the door labelled ‘Executive Quarters’. Once inside, head into the first room on the left, and ‘inspect’ the table to place your markers down.


